Confirmatory Factor Analysis (CFA) in AMOS
Confirmatory Factor Analysis (CFA) is a special form of factor analysis. This is conducted after exploratory factor analysis (EFA) to determine the factor structure of your dataset. If in the EFA you explore the factor structure, here in CFA, you confirm the factor structure you extracted in the EFA.
At this point, data must have been screened already and the EFA has produced a clean pattern matrix. Meaning, no cross-loadings. Factor loadings at each item should be greater than 0.40 and should average at least 0.70 at each construct. The data should also have acceptable values of KMO, x2/df, communalities, and factor correlation matrix.
There will be new plugins to be used in this step-by-step tutorial to make the analysis faster. Make sure to install the plugins before doing the analysis for a smooth process. Watch this video on how to install the plugins.
This whole CFA process will involve (A) Initial CFA, (B) Invariance test, (C) Model validity test, and (D) Common method bias test.
A. Initial CFA
Dataset to use: SPSS dataset after EFA
Plugin to use: Pattern matrix builder
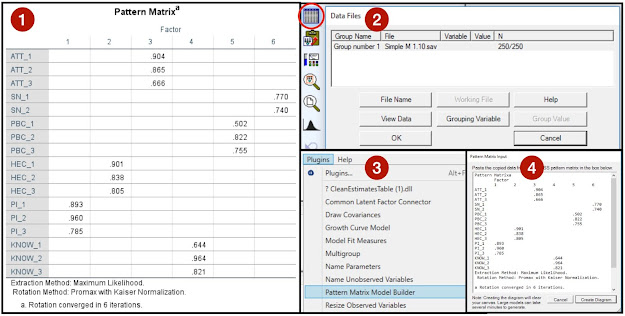
- In SPSS, copy the pattern matrix from the Output window.
- Open AMOS, go to Select data file — Locate and load the data.
- Make sure that the data is saved in SPSS.
- Go to Plugins — Pattern matrix builder
- Paste the pattern matrix — Create diagram.
- Name the latent variables.
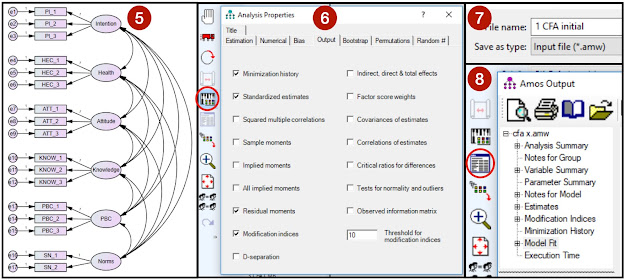
- Go to Analysis properties — Outputs — check Standardized estimates and Modification indices (set the threshold for modification indices at 10)
- Save as new file 1 CFA initial — clickCalculate estimates (or Run)
- Go to View text (or Output) — Model fit.
- Check for model fit. Refer to the thresholds for model fit measures.
- Update: There is a new plugin for this named Model Fit Measures.
- If there are model fit issues, check the modification indices tab.
- Look for modification indices referring to errors within the same construct.
- Covary only errors of the same construct.
- You cannot covary error and a construct.
- Check for model fit. Refer to the thresholds for model fit measures.

 |
| Steps for Initial CFA in AMOS |
Let us Help You with SEM or CFA Analysis & Result Interpratation - AMOS or SmartPLS
We are Experts in SPSS, EVIEWS, AMOS, STATA, R, and Python
B. Invariance Test
Purpose: To determine if measures are the same across groups. This is applicable if you are using a grouping variable (e.g. Male and Female; High knowledge and Low knowledge)
File to use: CFA initial
Excel file: Stats Tools Package
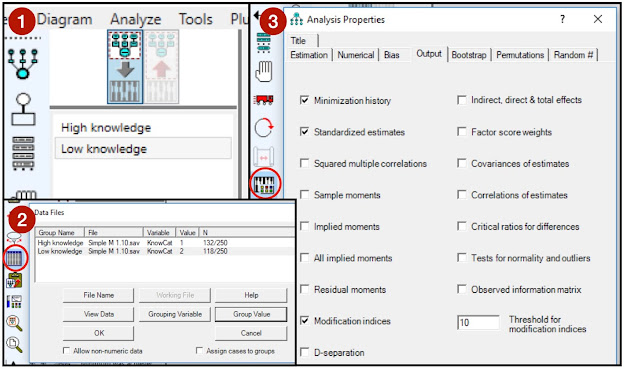
- In the Groups section, create groups base on your hypothesized model.
- Go to Select data file — Load the data for both groups — specify the Grouping variable and the Grouping value.
- Go to Analysis properties
- Check for Standardized estimates and Modification Indices (10)
- Save as new file 2 CFA invariance — clickRun
- For configural invariance:
- Check the model fit.
- Make sure there is a good model fit in terms of CFI, RMSEA, and SRMR.
- For Metric invariance,
- Compare the unconstrained and constrained model.
- For the unconstrained model,
- Look for the chi-square and df values.
- Enter the values in the Stats Tools Package ‘x2 difference’ tab.
- To fully constrain the model,
- Set the variance at each construct to 1.
- Remove the ‘Regression Weight’ of 1 from each regression line.
- Go to Plugins — Name parameters — Check regression weights — OK.
- DO NOT SAVE — then click Run.
- Look for the chi-square and df values.
- Enter the values in the Stats Tools Package ‘x2 difference’ tab
- Must have YES, for the model to be no different.
- Meaning, measures are the same across groups.
 |
| Setting up an invariance test in AMOS |
C. Model Validity Test
Purpose: It is important for the model to have adequate validity and reliability before moving to the causal analysis. There are two ways to do this: (C.1) using the Stats Tools Package or (C.2) using the Plugin.
File to use: CFA initial
C.1 Using the Stats Tools Package
- In AMOS, copy the following from the Output Navigation Tree.
- Go to Estimates — Scalars — Correlations
- Go to Estimates — Scalars — Standardized regression weights
- Open the Stats Tools Package Excel file.
- Go to “Validity Master” tab
- Paste the Correlations and Standardized regression weights accordingly.
- Run the data by clicking the large red button.
- Results will be instantly generated.
- Check the values. There should be no ‘validity concerns’.
- If there are ‘validity concerns’, go back to your dataset.
- You might have not met the minimum thresholds for EFA measures.
- Go back to data screening and redo the EFA.
 |
| Model validity test using the Stats Tools Package |
Get Help with Data Analysis & Result Interpratation for your Thesis or Dissertation for only $100 for 2000 words
We are Experts in SPSS, EVIEWS, AMOS, STATA, R, and Python
C.2 Using the Plugin Validity and Reliability Test
- Go to plugins — click the “Validity and Reliability Test”
- You will be redirected to a web page with the results.
- Check the values. There should be no ‘validity concerns’ and HTMT warnings.
- If there are ‘validity concerns’ and HTMT warnings, go back to your dataset.
- You might have not met the minimum thresholds for EFA measures.
- Go back to data screening and redo the EFA.
 |
| Model validity test using the Master Validity Plugin |
D. Common Method Bias
Purpose: To test whether the shared variance across all items is significantly different from zero or not. A chi-square difference test between the unconstrained and the constrained model will be done. This tutorial uses CLF, and not using a marker variable.
File to use: CFA initial
Plugin to use: Common Latent Factor
- Save a new file 3 CFA CMB
- In AMOS, click Select all then move the model to the right — and then Deselect all.
- To make an unconstrained model,
- Create a new latent factor (Don’t name it).
- Select it. Make sure it is outlined blue.
- Go to Plugins — Common Latent Factor.
- Save — Run — Proceed.
- Look for the chi-square and df values.
- Enter the values in the Stat Tools Package ‘x2 difference’ tab.
- To fully constrain the model,
- Delete the CLF.
- There might be a problem here.
- To solve the problem, close AMOS and then open again.
- Create a new latent factor. Name it CLF.
- Select the CLF. Make sure it is outlined blue.
- Go to Plugins — Common Latent Factor.
- DO NOT SAVE — Run — Proceed.
- Look for the chi-square and df values
- Enter the values in the Stats Tools Package ‘x2 difference’ tab.
- Must have YES for the model to have no shared variance.
- If it is indicated by NO. Then, that’s unfortunate.
- Meaning, you do have a lot of shared variance
- Use the unconstrained model as you do the imputation of factor scores
- Delete the constrained CLF
- Create back latent factor (Don’t name it).
- Select it. Make sure it is outlined blue.
- Go to Plugins — Common Latent Factor.
- Save — Run — Proceed.
- Impute factor scores.
- Go to Analyze — Data Imputation.
- A small window will appear — click Impute.
- Click proceed.
- A notification will appear if the imputation is successful.
- Imputed scores will appear as new variables in the SPSS file.
- These new variables will be used in the structural model
 |
| Data imputation in AMOS |
In summary, the CFA confirms the factor structure you extracted during the EFA. The model must have a good fit in order to proceed to the causal SEM. If you are using a grouping variable, you must do an ‘Invariance Test’. The ‘Common Method Bias’ test must also be performed to determine whether the shared variance across all items is significantly different from zero or not. If the model has a lot of shared variance, retain the CLF as you impute the factor scores. Hope this helps.


